
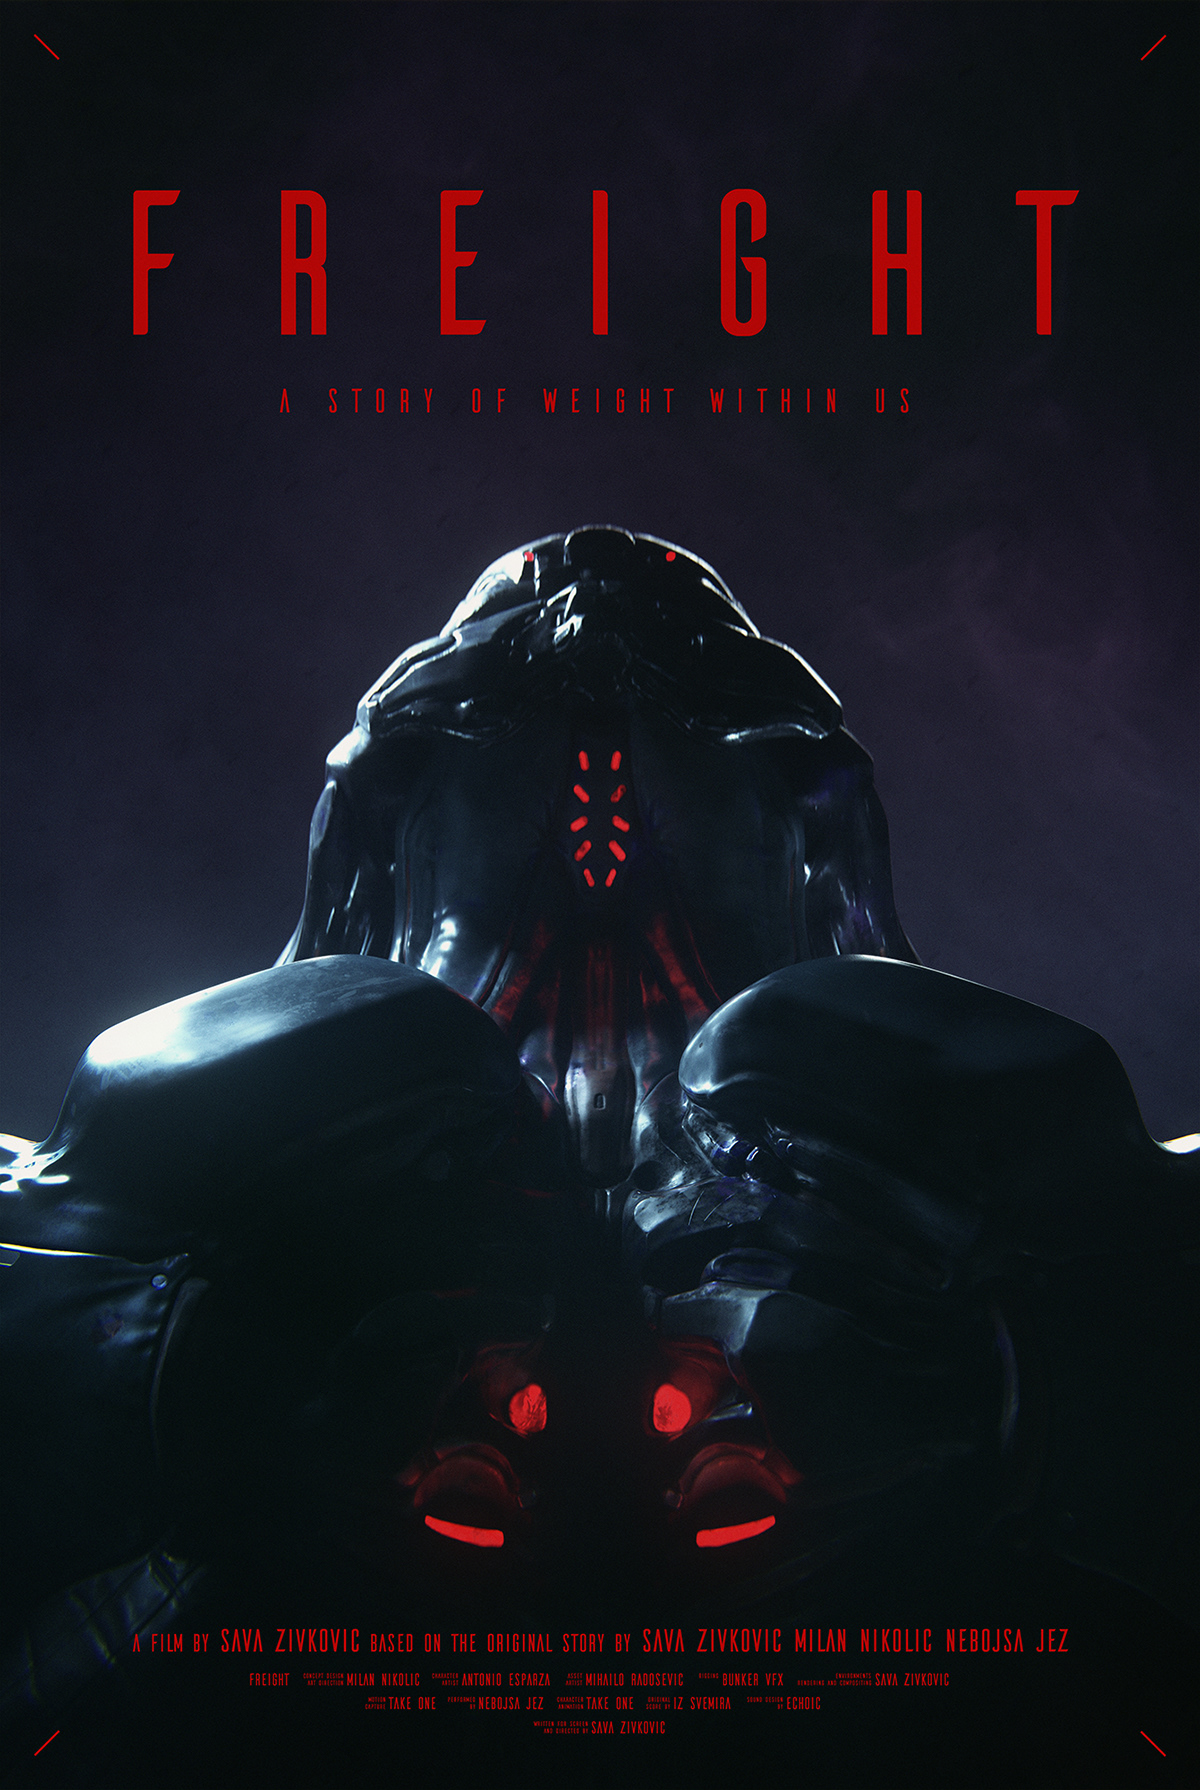
A story of weight within us.
Directed by – Sava Zivkovic
Written by – Sava Zivkovic, Milan Nikolic, Nebojsa jez
Art Direction / Concept Design – Milan Nikolic
Character Artist – Antonio Esparza
Asset Artist – Mihailo Radosevic
Rigging – Borna Berc / Bunker VFX
Motion Capture / Character Animation – Take One
Motion Capture Performance by – Nebojsa Jez
Environments / Rendering / Compositing – Sava Zivkovic
Sound Design – Echoic
Original Score by – Iz Svemira
Tools: 3ds Max, Redshift, Substance Painter, Zbrush, 3D Coat, Adobe Suite
THE STORY
FREIGHT started out as a pitch for a client project. We were tasked with creating a short film that could demonstrate the capabilities of an upcoming real-time ray tracing technology. There were no creative limitations, everything regarding the story or the art direction was left to us, which at time seemed like a dream project finally coming to fruition.
We’ve assembled the core team of longtime friends and collaborators, Milan NIkolic, Nebojsa Jez and myself, and developed the pitch for the project, consisting of the script, character concept art and a detailed previz, as well as some keyframe renders. A pretty strong start for any project. Unfortunately due to many variables the client couldn’t proceed with the project, which left us with a completely developed idea, one that we felt really strongly about, but without client funding to produce it.
Since the three of us felt incredibly passionate about the story we’ve crafted, and since we owned the rights to the IP, we decided to yet again take the plunge into the unknown and fund and produce the project ourselves.
PROCESS
Along the way of creating FREIGHT we’ve had an opportunity to apply what we’ve learned working on AAA video games, but also test some of our own workflows. This video documents some of those workflows and the process behind the creation of FREIGHT.
PRE-PRODUCTION
The Workflow
Having very limited time of 7 days to come up with a clear pitch for a project of this scope, we had to develop a workflow that would allow us to produce multiple original assets to be used in the pitch.
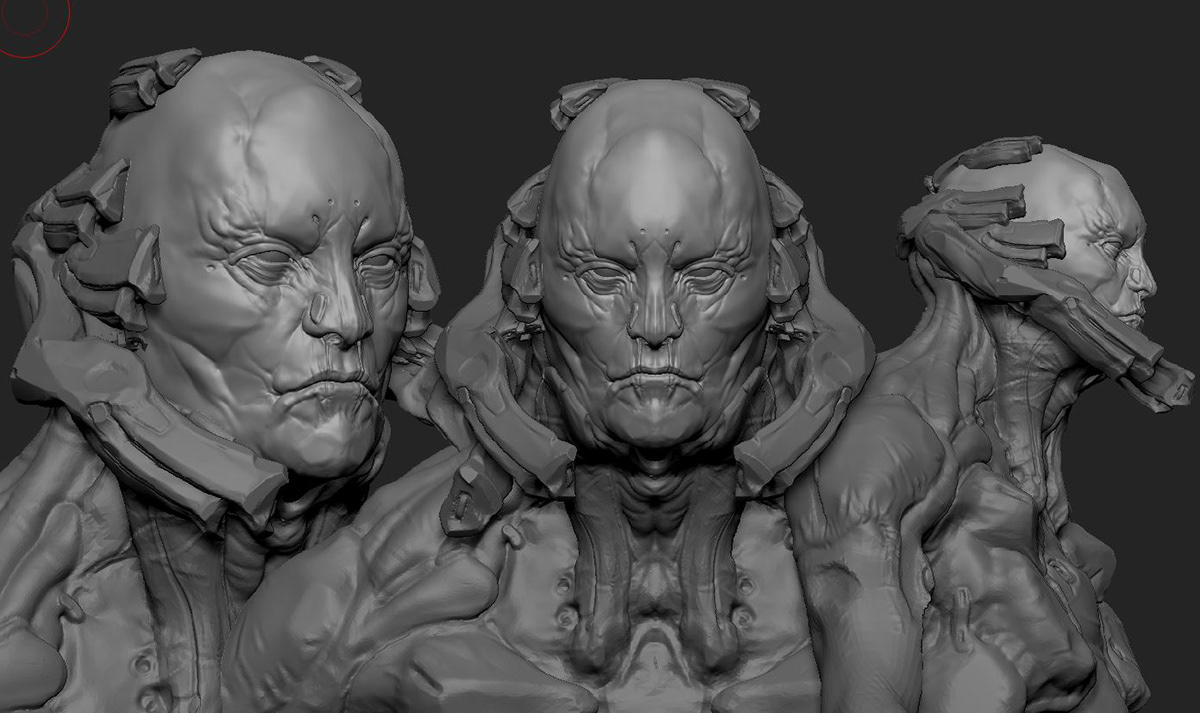
Once we created the story, Milan immediately started working on a 3d concept sculpt for the character, while I started working on a previz. I’ve used a placeholder character asset from our IFCC project and was able to lock in all the shots while Milan was creating the character.


When the 3d concept sculpt was created I’ve switched the placeholder character in the previz for the finished concept and worked on fine tuning the edit. At the same time Milan was working on the final character concept paint-over.


As the 3d concept sculpt was pretty detailed, I was able to use it and do some very early look development, that would end up as key-frame renders to go along with the rest of the pitch material.
Concept Art
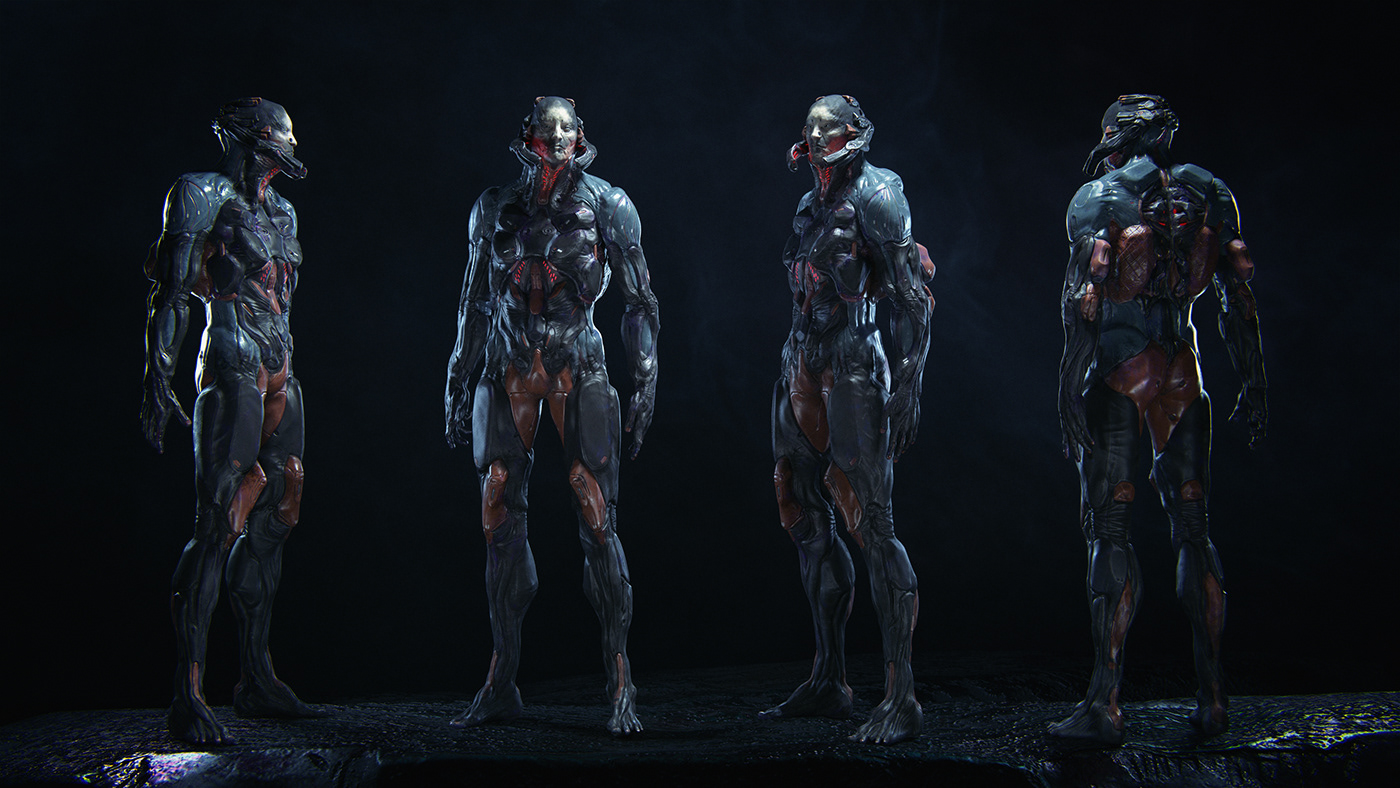
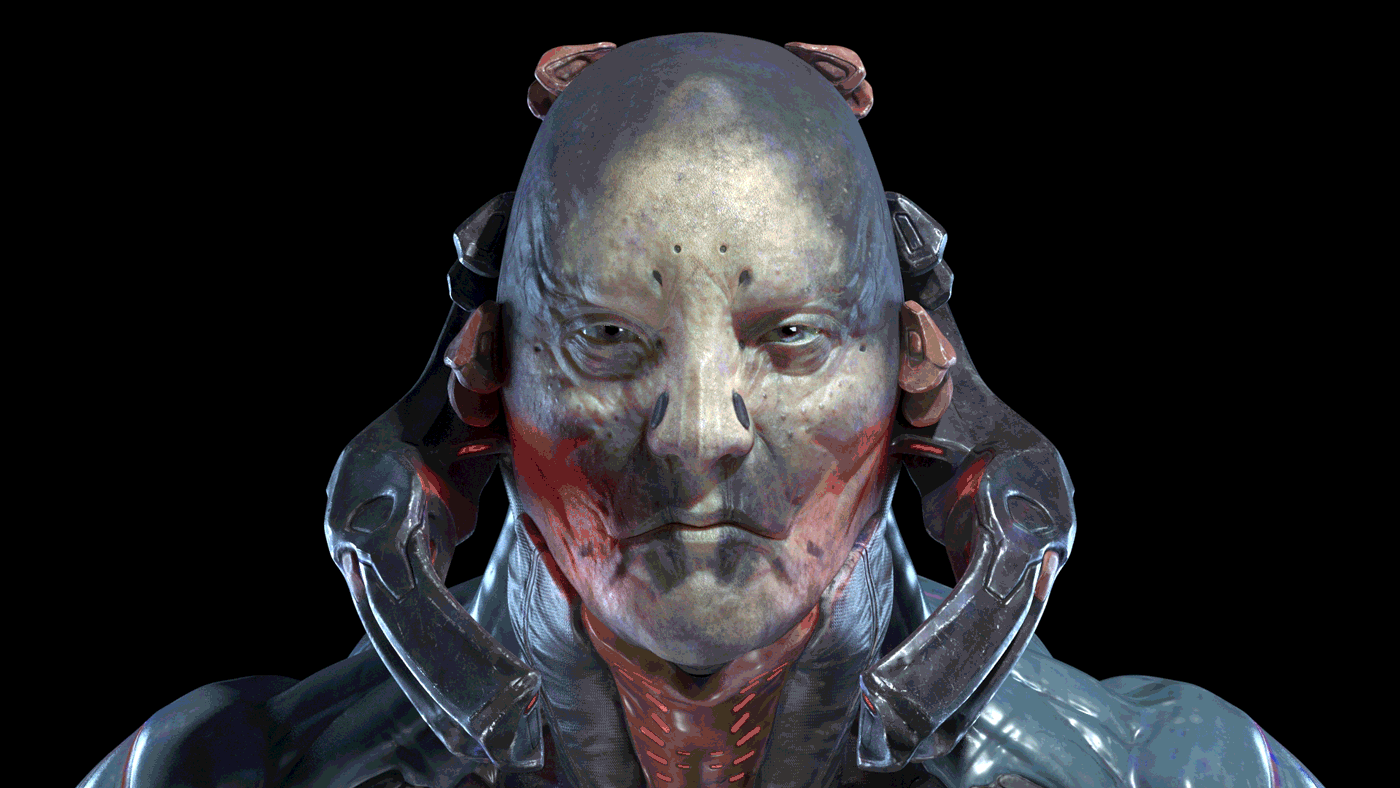
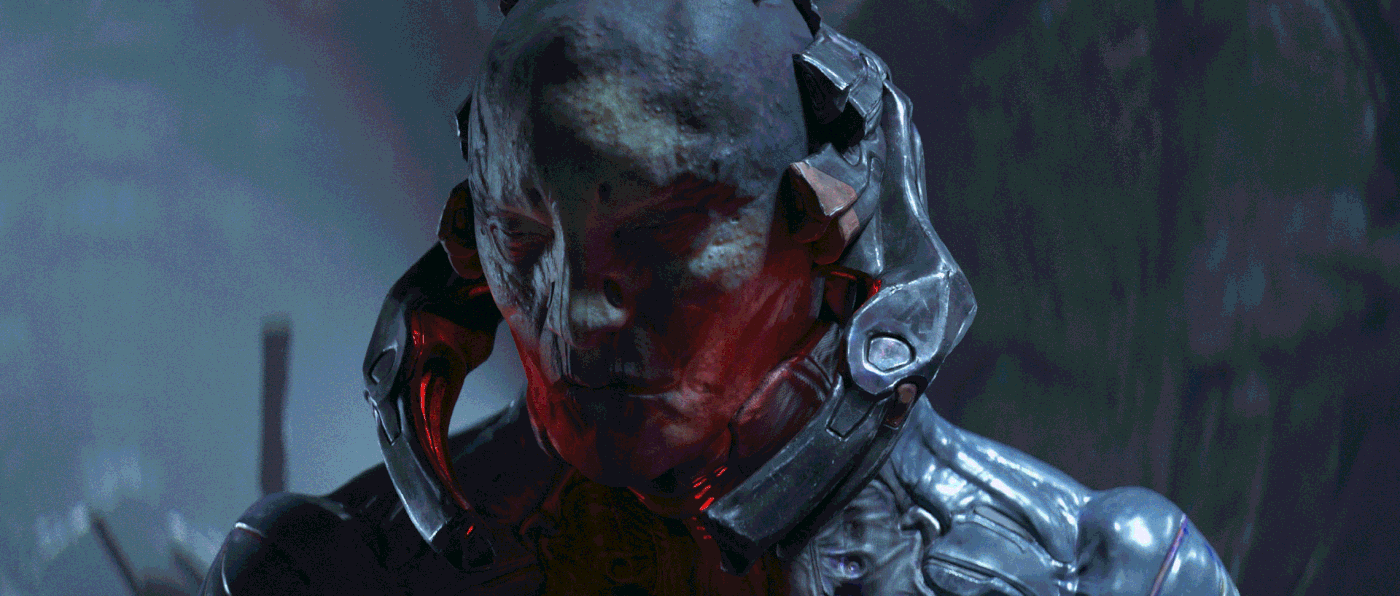
The story called for a tortured soul, a creature lost in this non-descript world, forced to carry the weight of his miss-deeds. The main visual signifiers used to describe the character are his hunched back and neck, strained from carrying the weight, as well as his strong elongated arms and a sense of food deprivation reflected in his stomach.
Milan used his tested and proven workflow for designing the character and the props. He sculpted the base forms with Zbrush and finished up the paint over in Photoshop, giving clear guidance on the materials and texture to the asset artists later on in production.


Previz
For the previz I wanted to give a very clear approximation of the final film, which meant using the actual character, locked camera angles and an indication of lighting and atmosphere. The duration was a bit shorter than the finished film since we were dealing with very rough animations and we knew some actions will be prolonged by motion capture performance in later stages.
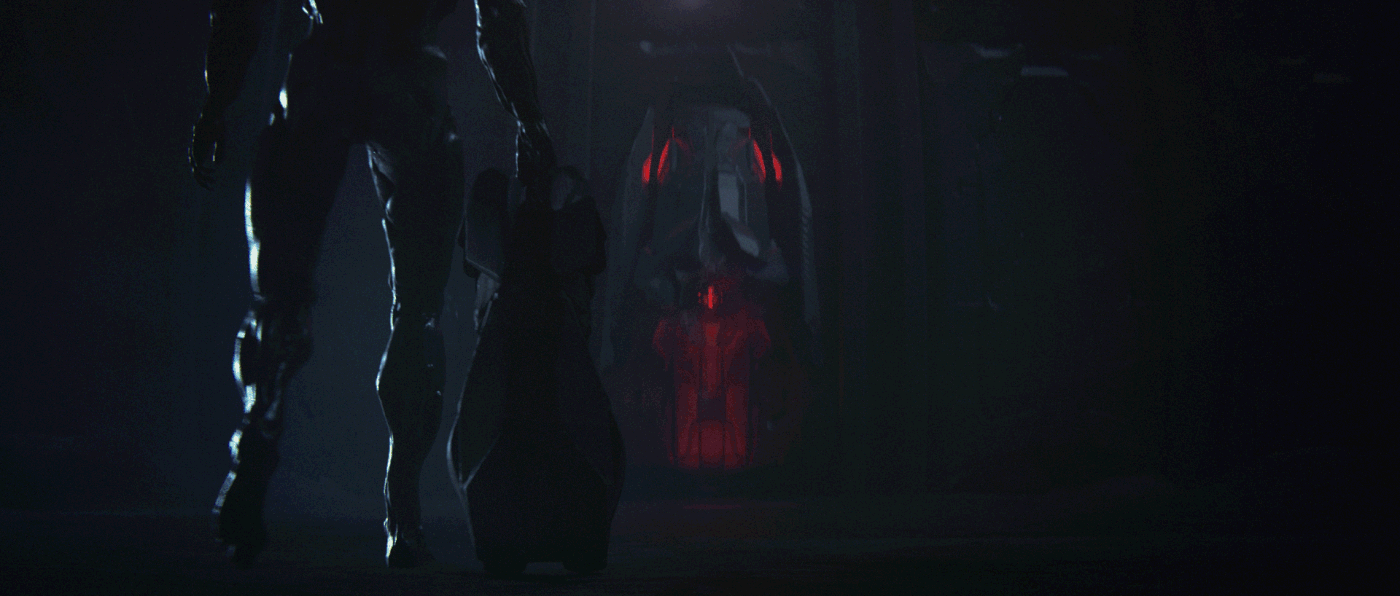
The cinematography rules we used are presenting the character with a handheld operated camera, showing his inner instability, while the payload he’s freighting is always shown with a locked off stable camera. The use of close up was there to build up the tension as our character is faced with moments of weakness, after which I would always cut to a wide shot, relieving that tension and bringing back breathing space.
The environments were really roughly blocked in and did not represent the final look, but they contained all the biggest compositional elements that were crucial to the story.

R&D / Keyframes
These early test renders were very different look-wise to what our final picture ended up looking like, but having these images very early on helped with the pitch since the clients could envision how the not so realistic previz could actually look like. It also helps with motivating the team, as we get to see an early depiction of our world just days after we’ve finished writing it.
These images were also the testing ground for render engines and finding the right one for this project. For these I’ve used Vray, Octane and Redshift, but I’ll elaborate more on the chosen renderer below in the production section.


PRODUCTION
Character
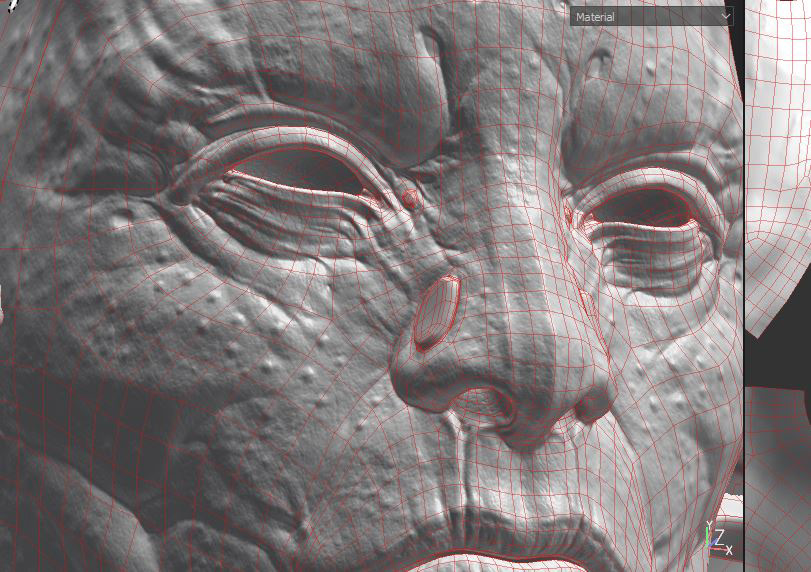
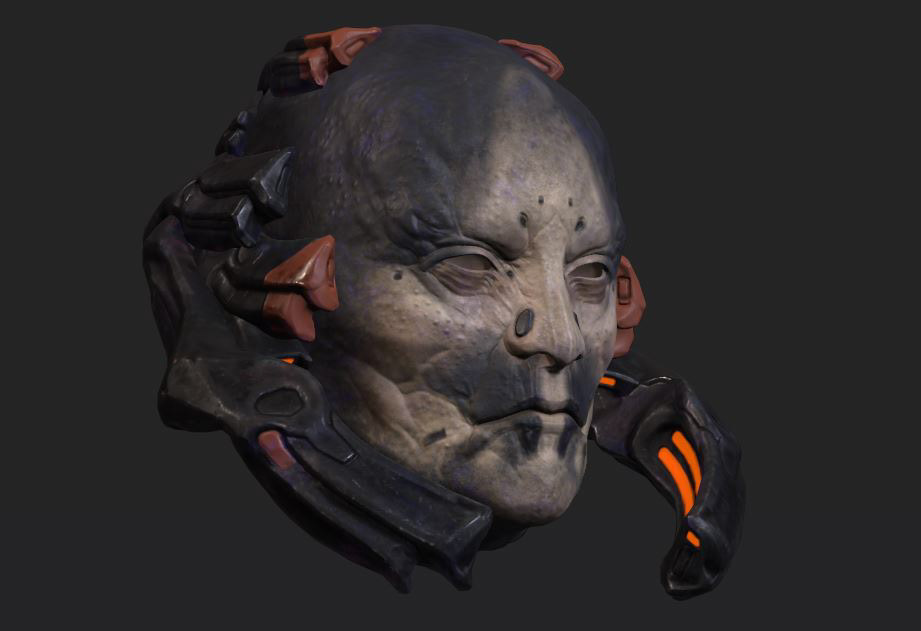
The character asset was created by incredibly talented Antonio Esparza. We’ve met Antonio through Milan’s Learn Squared mentorship and after a quick call he was immediately onboard for the project. Antonio used all the typical tools of the trade, 3ds Max, Zbrush and Substance Painter in order to model, sculpt and texture the character. Having Milan’s 3d concept sculpt was an enormous help as all the proportions and major shapes were clearly defined.
Antonio’s process images
The model was then rigged by my friends at Bunker VFX, a local CGI studio, where Borna Berc handled the rigging. Antonio also modeled over 40 facial blend shapes for a FACS driven facial rig.
Bunker images, rigging print screens, scripts, code, blendshapes, blendshape gifs
We’ve decided to go for a mid-density poly count for our final asset and let the normal and displacement maps do all the heavy lifting.


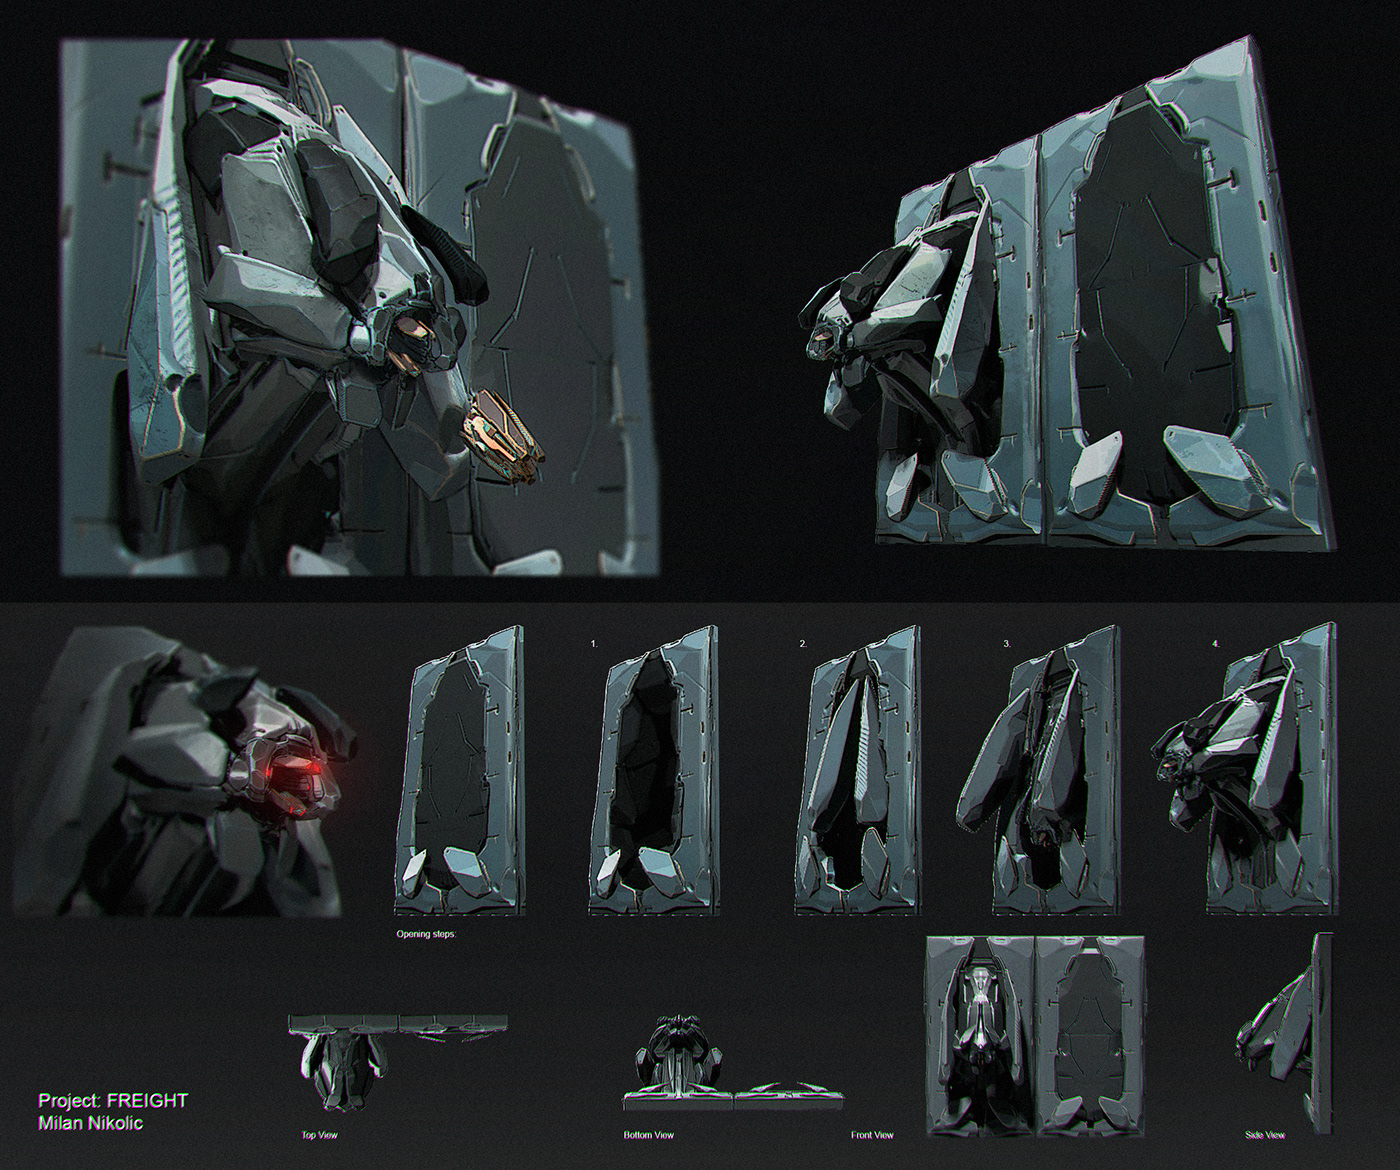
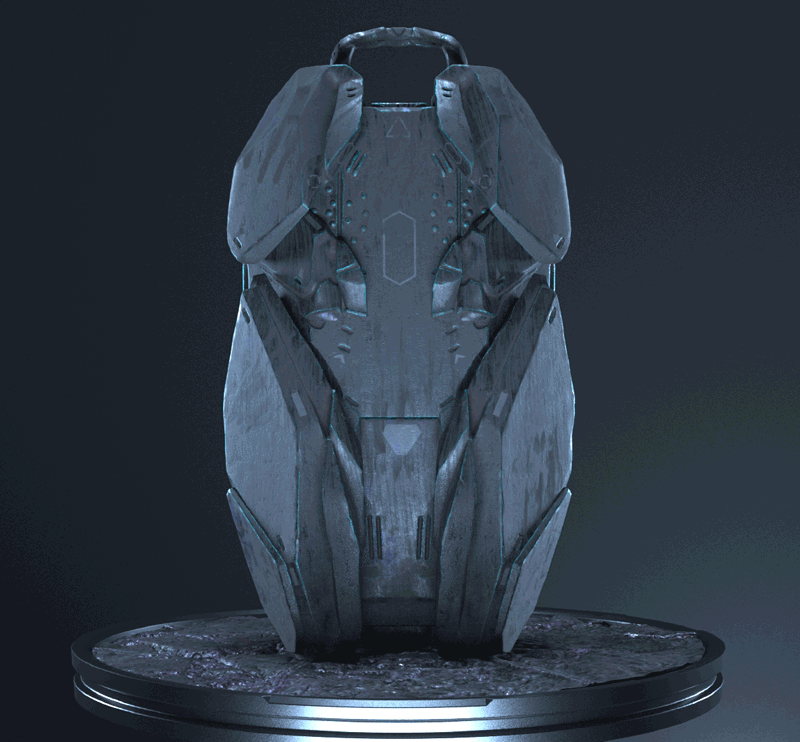
Props
The Case and the Wall Machine assets were modeled by a good friend and an amazing artist Mihailo Radosevic. Mihailo also used 3dsMax/Zbrush/Substance combo in creating the assets. If you’re interesting in modeling for production, Mihailo has an upcoming course on Learn Squared, so make sure to check back on their website for the release date!


Environments
Due to the restricted time, I had to come up with a workflow of creating environments as efficiently as possible, whilst retaining the appearance of quality production.
The solution I came up with was to use Milan’s concept sculpts, break them up into individual pieces, quickly add more detail in Zbrush, texture in substance painter with a pre-made smart material, and use all those pieces as a kitbash set across all environments. This workflow made sure that the quality will remain consistent across all scenes as every single asset would have the detail pass in zbrush and custom textures from substance painter, and all of the elements could be easily manipulated based on the shot requirements.


There were some hero assets still required, like the tunnels, the wall and plateau in the last scene. For those the workflow was the same, but the UVs were packed in multiple UDIMs so we could make the most use of textures for driving the small scale detail.


Performance Capture / Animation
We’ve had a pleasure of working with Take One, a local motion capture and animation studio, once again. A lot has happened since our last collaboration for IFCC titles back in 2017 and Take One had upgraded their studio to full performance capture capabilities, meaning the large capture stage is now completely sound proofed allowing dialogue recording and new head gear allowing facial performance recording at the same time.
Our longtime friend and collaborator Nebojsa Jez (Iz Svemira) rose up to the task of performing the character yet again. Nebojsa was a perfect fit for the role for two reasons, he co-created the story and knew exactly what we were trying to accomplish, and having worked with him before on IFCC we realized he has an incredibly natural way of performing and we wanted to take advantage of that fact. We’ve rehearsed the performance prior to the shoot and made shot lists and scene overviews to be as prepared as possible.
The shoot was completed in a swift half a day, after which Take One processed the files and started additional animation work. I was able to create an updated edit based on the live solve data and provide Take One with camera animations so that they could focus on animating from the camera’s point of view and not do unnecessary work.
The facial performance, which was the biggest hurdle of this project, was keyframed in the end, as we didn’t have enough time or resources to go into proper facial solve.


Rendering
This project brought a specific set of production challenges as I knew at the very start that we’re going to be dealing with a lot of fog and realistic skin shading. After years of using Octane and Vray I knew that these two engines are not going to give me the result I was after in the very limited time and resource I had. Enter the amazing Redshift Renderer. Although the integration with 3ds Max isn’t as good as Vray, I was stunned by the speed/quality ratio. Every shot in this film ended up being rendered with Redshift for 3ds max, with average render times going anywhere from 30 seconds per frame up to 3 minutes per frame on a 4x EVGA 980ti Hybrid workstation.


Color Scripts / Art Direction
Another interesting workflow we’ve experimented with was the color scripts and the interaction between myself and Milan, and how going back and forth influenced our choices that defined the look of the film.
While I was assembling the environments, I was exporting test renders and experimenting with quick compositing to try and get the general mood of the film. Some of the main color choices were made here, like the overall purple-ish fog. But to take things further I’ve assembled the boards containing every shot, which Milan could then take into his pipeline and paint over. Milan accentuated major shapes, made object composition changes per shot, and re-defined lighting. You can see the before and after below.
Being able to work with an art director/concept artist who would fine tune the color script with paint-overs brought the additional level of iteration which informed the final look of the film.


POST-PRODUCTION
The project featured extensive compositing work, all achieved in After Effects with a suite of plugins. I’m constantly trying to emulate the anamorphic film look, as I strongly feel that certain visual signifiers such as elongated bokeh, lens distortion, vignetting, chromatic aberration, lens flares and film grain play a big role in the elusive cinematic look. I think we are all inadvertently used to that look by having watched the old cinema masterpieces for bigger parts of our lives and we immediately perceive those signifiers as being cinematic. This of course is only a small portion of what makes an image display true cinematic qualities, but these are my rules that I like to stick to for every project I do.
The main bulk of the compositing work breaks down as follows:
1. Exporting the camera position and locators from 3ds max to After Effects using AE Transfer script
2. Adding 3d particles using particular and the exported camera to match the motion of the shot
3. Adding various fog stock footage elements to break up the look of the atmosphere
4. Color grading the shot via magic bullet looks to match the color script
5. Adding all the subtle lens effects such as chromatic aberration and vignetting
6. Adding video copilot optical flares using the real 3d position of the light exported from the scene
7. Finishing up with a final grade and film grain using Film Convert
The post production work took an extensive period of time, as I really wanted to give every shot the time it deserves and not rush things. Same as with lighting, the compositing stage is one that benefits from iteration, and working with an art director made the work so much easier as we were able to identify the problems sooner and solve them accordingly.


MUSIC AND SOUND
FREIGHT marked a first time collaboration between Echoic, a Bristol based music and sound design studio and my close friend and incredible composer Iz Svemira. We wanted to expand on the audio experience for this film, and Iz wanted to focus entirely on scoring the film which left room for a team dedicated solely to the sound design aspect.
Tom Gilbert and David Johnston of Echoic handled all the bespoke sound design for the film, resulting in a rich audio experience, further helping solidify the believability of this world.
With the score, Iz Svemira’s first goal was to figure out which perspective he’d tell this story from, and chose the cave, as his main character. He decided to use a smaller, chamber orchestra, as to convey the confines of a mind imprisoned by desire. The ever present need to get a new fix has a relentless pulsating quality to it, which is why he doesn’t tie the notes in together, but rather lets them play slowly one stroke of the string at a time. This helped channel through the quite ruthless pushing of the mind to give in.
The pulse amps up tremendously in moments when the mind is about to surrender, and is taken over by a deafening, distorted, hostile synth, as if to let us know that this particular fight is far from an easy one. He used a nifty trick to portray a disoriented mind, the kind it is at its most fragile: he let the sound get way out of phase, because the human ear, when these phase correlation issues occur, has trouble locating the sound in the stereo space, throwing the listeners off balance, hopefully making them understand how it feels to resist temptation on that level.
As the last obstacle is overcome, Iz lets us hear the full theme progression, all the joy and sadness of a battle won in this particular war. But the struggle isn’t over, and the road is long, if not infinite. Iz throws everything in, as we are faced with the wall of our flaws in full its monstrous glory, pulses screeching, choirs of our lost selves wailing in despair.


STILLS


THANK YOU!
Thank you for scrolling through the entirety of accompanying material for FREIGHT! This film has been another incredible learning experience and a very personal story shared between Nebojsa, Milan, myself and probably every artist who had a chance to work on it. I hope you’ve enjoyed the film and I hope all the additional info has been useful in some way. If you’d like to stay up to date with any future projects follow us on instagram below.


