
Tron Motorcycle - Early stage development
Before I went about modeling the bike in Maya I had to go about developing a plan as to how it would be put together. In the end I decided it would simplest to begin with the wheels as I could than extrude the middle faces of each wheel to form the body of the bike. Therefore I went about creating a simple wheel using the cylindrical polygon. Once I had completed the wheel to the appropriate standard I than went about duplicating this wheel as the front wheel would be more or less the same. The only difference being that it would be slightly larger in order to allow for a larger top body which can be seen in the photo which I used as a reference. This would also allow me to save on a lot of time and effort in this paticular area + I could now move on + start developing the body of the bike.

Forming the back body of bike
While my previous model consisted of individual objects for both the wheels and body, for my second effort I took the decision to extrude from the faces of both the wheels so as to save myself a lot of hassle in terms of putting the polygons together. It would also save a considerable ammount of time in terms of the rendering process when complete. As you can see from the picture above the extrusion from the back wheel enabled me to more or less form the back body of the bike with minimal effort. Converting to faces once more from object mode allowed me to pick the faces I needed and drag them down in order to form the shape of where the bike seat would go. Extruding faces once more allowed me to create the bikes back fin.

Forming body of bike (Early Stages)
The same process was carried out for the front wheel in order to form the front body of the bike. Both objects were than positioned together in order to form the overall body of the bike. Obviously both objects did not fit together seemlesly so I had to go about extruding numerous edges and faces on both objects so I could make the bikes body look as real as possible. I made sure to extrude many of the back bodies faces inward quite a bit due to the fact that the back of bike was thinner than the front in the picture I was using as reference. I enlarged the front body slightly so as to once again resonate with the picture sourced for this model assignment. Once this was completed I went about altering both of the bikes wheels. What I wanted to do was have an outer edge on each wheel so as to make them a little less circular + flat on top. Finally I also went about removing a number of faces on the front wheel so part of the bikes inner front wheel would eventually be visible.

Body of bike complete
Above is a shot of the bike with various polygons completed. As I felt the shape of the body of the bike was not completely accurate to the picture I had sourced as inspiration I made the decision to go over the body once more and extrude various edges + faces. Another feature that had to be included were the handlebars of the bike. I created the handlebars using a long rectangular polygon of appropriate size and width. I extruded a number of faces down the center of the rectangular polygon as this was a feature of the handlebar in the actual photograph. A cylindrical polygon was than used for the actual handle of the bike and then duplicated for the handle on the opposing side. Once the handlebars were complete I than had to go about creating the seat for the bike. I decided to once use a cylindrical polygon, this time of a larger scale. I than went about removing the faces from the bottom half of the polygon object and manipulating the top half into the shape of a seat and placing on top of the body.

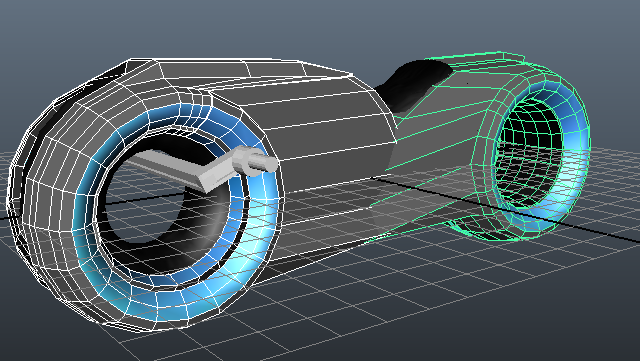
Wireframe view of Tron motorbike
Throughout the process of creating this model I would often change to perspective view where I could view the model from numerous different angles and in wireframe form. Viewing the tron motorcycle in this format enabled me to determine whether or not each of the polygons were in place. It also allowed me to judge the objects + whether or not they were properly alligned. This feature was very effective in helping me ensure that the wheels of the bike were on the same level.

Texture used for model
Each of these numerous textures were downloaded from the web to use for this project. For the wheels I sourced a tyre texture which can be seen above on the left hand side. I than downloaded a steel texture (center) to be used for the handlebars. The neon blue texture was than sourced and manipulated in Photoshop, this was used for the rims of the wheels. Further down the line I hope to add a light against this neon blue color to really resonate with the Tron legacy theme. The process of applying each of these textures was more or less straight forward. Firstly I had to go about switching to rendering mode. From here I than clicked on the Lighting/Shading tab. This allowed me to choose the option Assign a new material. From here I chose a Blinn and gave it a name of my choice. More often than not the Blinn would be named after the object I was working on. For example when assigning a texture to the tyres I went about naming the Blinn Tyre Texture. Once a nme had been placed on a particular Blinn I than closed the window. The next step was to click on the Window tab and choose the option hypershade. This would than opened a window and from here I chose the blinn Tyre Texture and assigned the downloaded texture to that blinn. From there it was as simple as dragging the blinn onto the chosen object.

Adding texture (early stages)
Above is a screenshot of a texture I applied to the model at the very beginning as a trial run. The texture I downloaded was a rubber black texture that I felt would work well on the wheels. Here I have placed it on the seat also just to get an idea of how it looks overall. The black on the wheels would later be changed as I didn't like how it looked just like a plain black color and wanted tyre rings to be visible. I would also later reduce the reflectivity on the blinn so as to make the tyres look less plastic and more rubber.

Close up of handlebars with texture applied
Above is a close up of the steel texture that I applied to the handlebars of the model. This texture I felt looked well so therefore was not changed. From this close up you can also see where I carried out the extrusion on the handlebars to coincide with the picture of the bike I was referencing.
Neon blue texture applied to wheel rims
Above is a screen shot of the tron legacy motorcycle with the neon blue texture applied to the wheel rims. This I felt looked very effective so therefore I stuck with it for the fully completed + rendered model. Further down the line I hope to place a light against the neon blue in order to give it that real neon feel that can be seen in the motion picture Tron Legacy. Originally this model was to be animated to fall down through water. It is for this reason I chose the tron model as I felt the neon lights in water would be really effective.


Shiny black texture applied to body
While the various other textures for the wheels, handlebars etc. were sourced from the web, the body was completed using a shiny black blinn already present within maya. At first I felt this would suffice as the tron motorcycle picture I was using as a reference was black in color also and had no great detail overall. In the end however I felt this black blinn did not look well on the body when fully rendered so I decided to download a black metal texture which could be used on the bike instead. This I felt was far more appropriate and looked significantly better when rendered.

Test render of Tron bike within Maya (Side View)

Test render of Tron bike within Maya (3/4 View)


Various angle views of completed model fully rendered


Completed model fully rendered + placed against sky background


Fully complete render with glow intensity added to the Neon blue Blinn


